Why Highlighter Matters
Strategic highlighting: – Lifts cheekbones – Brightens under eyes – Defines brow bones – Slenderizes nose – Creates a healthy, lit-from-within glow But placement is everything. Put it in the wrong spot, and you emphasize texture, pores, and wrinkles.The Science of Light and Shadow
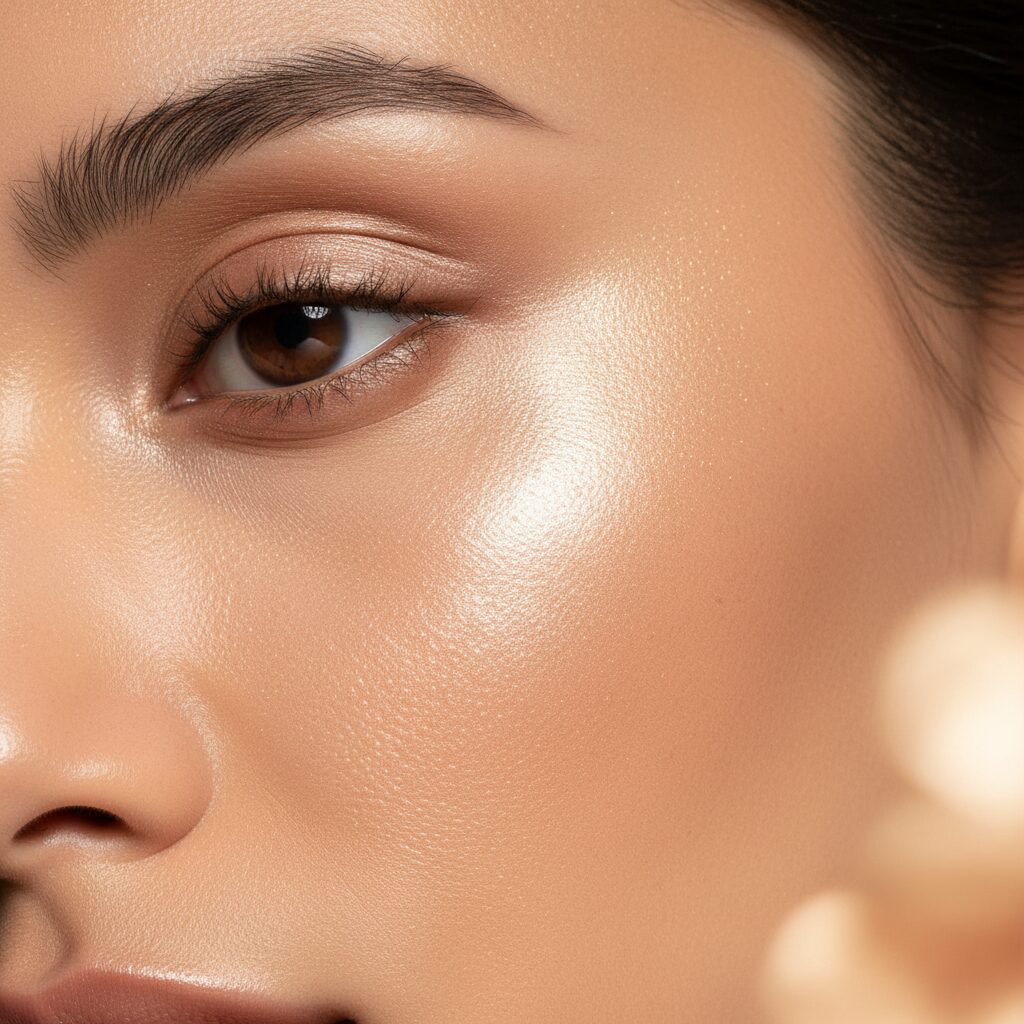
Understanding highlighter starts with understanding how light hits your face. High points—cheekbones, brow bones, the bridge of your nose—naturally catch light. By enhancing these areas, you’re essentially amplifying what nature already gave you. The key is subtlety. You want people to notice your glow, not your highlighter. When done right, it looks like you’re glowing from within, not like you’re wearing shimmer.Where to Apply Highlighter (The Pro Map)
DO Apply Here:
1. Cheekbones (The Lift)Find the top of your cheekbone. Apply in a “C” shape from temple to apple. Stay above the hollow of your cheek. 2. Brow Bone (The Definition)
Apply directly under arch of eyebrow. Makes brows look lifted and eyes more open. 3. Inner Corner (The Brightener)
Tiny dot in inner eye corner. Instantly makes you look awake. 4. Cupid’s Bow (The Pout)
Small line above center of upper lip. Creates fuller lip illusion. 5. Nose (The Sculpt)
Thin line down center. Small dot at tip. Blend edges well. 6. Chin (The Balance)
Tiny dot on center of chin. Balances forehead highlight.
DON’T Apply Here:
– Center of cheeks (emphasizes pores) – Wrinkles or fine lines (makes them more visible) – Active blemishes (draws attention) – Entire forehead (looks greasy)Powder vs. Cream vs. Liquid: Which to Choose?
Powder Highlighter
Best for: Oily skin, beginnersPros: Easy to control, buildable, long-lasting
Cons: Can look dry on mature skin
Application: Fluffy brush, light sweep
Best drugstore: e.l.f. Baked Highlighter ($5), Wet n Wild MegaGlo ($5.99) Powder was my gateway into highlighting. It’s forgiving—you can build slowly and blend out mistakes. I still reach for powder when I want a more dramatic, “going out” glow.
Cream Highlighter
Best for: Dry skin, mature skin, natural lookPros: Melts into skin, looks natural, hydrating
Cons: Can slide off oily skin
Application: Fingers or damp sponge
Best drugstore: e.l.f. Monochromatic Multi Stick ($5), ColourPop Super Shock Cheek ($7) Cream highlighters are my everyday go-to. They blend seamlessly into foundation and look like skin, not makeup. The key is applying before powder—cream over powder is a recipe for patchiness.
Liquid Highlighter
Best for: Mixing into foundation, body glowPros: Versatile, buildable, luminous
Cons: Harder to control placement
Application: Mix with foundation OR tap on with finger
Best drugstore: e.l.f. Halo Glow Liquid Filter ($14), L’Oréal True Match Lumi Glotion ($12.99) Liquid highlighter is the secret to that all-over glow. I mix a drop into my foundation for everyday radiance, or apply it directly to high points for more impact. The e.l.f. Halo Glow has become my holy grail—I use it almost daily.
Application Techniques by Skin Type
Oily Skin
– Use powder highlighter only – Set with setting spray after – Focus on high points only – Avoid center of faceDry Skin
– Cream or liquid formulas work best – Can apply more liberally – Mix liquid into foundation for all-over glow – Powder highlighter on top if neededMature Skin
– Cream formulas only – Avoid glitter (emphasizes texture) – Apply before foundation for subtle glow – Focus on cheekbones and brow bone onlyThe Pro Application Method
Step-by-Step:
1. PrepApply foundation and concealer. Set with powder if needed. Wait 2 minutes for base to settle. 2. Choose Your Tool
Powder = Fluffy fan brush
Cream = Fingertip or damp sponge
Liquid = Beauty sponge or finger 3. Apply Strategically
Tap product on, don’t swipe. Start with less—you can add more. Build in thin layers. 4. Blend
Use clean brush or sponge to blend edges. No harsh lines should be visible. Should look like skin, not product. 5. Set (If Needed)
Powder highlighter: setting spray optional
Cream/liquid: ALWAYS set with powder or spray
Common Highlighter Mistakes
Too Much Product
Fix: Start with tiny amount. Build up slowly.Wrong Shade
Fix: Match undertone—cool skin = icy/silver, warm skin = gold/champagneToo Low on Cheeks
Fix: Stay above the hollow. Smile, apply to top of apple.Unblended Stripes
Fix: Blend edges until seamless. No visible lines.Glitter Overload
Fix: Choose “shimmer” not “glitter.” Mature skin should avoid sparkle.Highlighter Shades for Your Skin Tone
Fair Skin
– Icy white – Pearl – Soft pink Best drugstore: e.l.f. Baked Highlighter in “Moonlight Pearls” ($5)Light-Medium Skin
– Champagne – Soft gold – Rose gold Best drugstore: Wet n Wild MegaGlo in “Precious Petals” ($5.99)Medium-Tan Skin
– Gold – Bronze – Copper Best drugstore: e.l.f. Baked Highlighter in “Blushed Gems” ($5)Deep Skin
– Bronze – Copper – Gold Best drugstore: Makeup Revolution Renaissance Illuminate in “Golden Lights” ($7)Advanced Highlighter Techniques
Layering for intensity: Apply cream highlighter first, then set with powder highlighter in the same shade. This creates a multidimensional glow that lasts all day. The “dewy dumpling” look: Mix liquid highlighter into your foundation, then apply cream highlighter to cheekbones. Top with a tiny amount of powder highlighter only on the highest point. Body highlighting: Apply liquid highlighter to collarbones, shoulders, and legs for a subtle sheen. The L’Oréal Lumi Glotion is perfect for this.Complete Highlighter Routine
Products: – e.l.f. Halo Glow Liquid Filter ($14) — mixed into foundation – e.l.f. Baked Highlighter ($5) — cheekbones, nose – Total: $19 Time: 2 minutesResult: Lit-from-within glow
The Bottom Line
Highlighter should enhance, not announce itself. The best highlighter looks like you’re glowing from within—not like you’re wearing shimmer. Start subtle, focus on high points, and blend until seamless. My daily routine: Mixed liquid into foundation + powder on cheekbones only. Takes 2 minutes, looks effortless.Related Articles
– Best Drugstore Highlighters for Every Skin Tone – How to Contour for Beginners – Best Makeup Brushes Under $20 *This post contains affiliate links. If you purchase through these links, I earn a small commission at no extra cost to you.* What’s your highlighter technique? Share your tips in the comments! *Last Updated: February 2026*Shop These Products
Ready to try these products? Find them all on Amazon.
As an Amazon Associate, we earn from qualifying purchases. This helps support our independent reviews at no extra cost to you.